These darling cuties are quick and easy to make. They set quickly, and do not deform when during handling. They store well so make a dozen or more at a time. Your customers will be enamored. They are perfect for adorning baby shower and christening cakes. Magically turn the baby into a mermaid, a sleeping Santa or even a little angel.
Preparing the molds and melting the Isomalt:
These thin latex molds are detailed and easy to handle. Thoroughly wash and dry the mold, then lightly grease with white shortening.
Half fill a sink with cold water and carefully float the molds in the water. The raised lip on the side of the molds will prevent them from sinking.
Wearing disposable gloves to avoid burning your hands melt the Isomalt in a pot over medium heat stirring occasionally to ensure all the granules are melted. Wash down sides with water using a pastry brush. Bring Isomalt to a rolling boil and then reduce temperature to just a simmer.
And white airbrush color to make the Isomalt opaque. Be very careful when adding liquid as the Isomalt will splatter. When bubbles subside add the required flesh tone. Turn off heat.
Carefully pour the Isomalt into a Pyrex or stainless steel pitcher.
Hold the mold at the feet end and gently pour Isomalt into the mold, head first. Slowly fill the mold to the first ridge. Don't be concerned if you overfill as you can remove the excess very easily after de-molding the baby.
Allow the molds to float in the water until firmly set (approximately 20 min.).
Put a dry a kitchen towel on the counter. Carefully take the molds out of the water and place on the towel until the latex molds are dry.
De-mold the babies starting feet end first. The mold will stretch and peel away easily.
Lightly dust the babies with a little cornstarch to ensure they are completely dry. They may be stored at this stage in a cardboard box for up to 12 months.
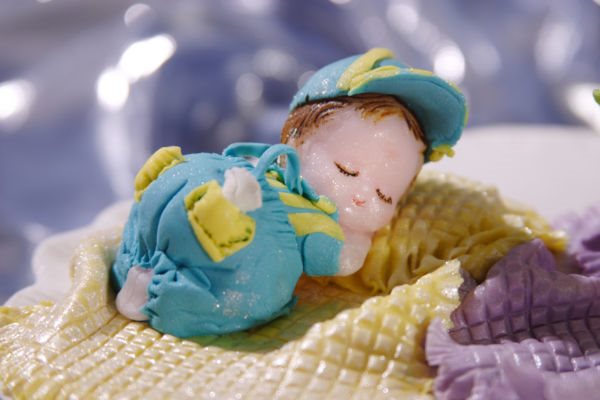
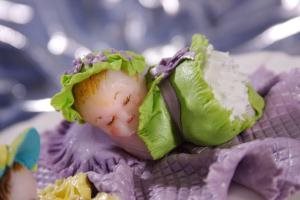
Dressing the baby girl:
Sugar and spice and all things nice, that's what little girls are made of...
Mix a golf ball size of 50/50 white fondant /gum paste, a 50-50 golf ball size lime green and a small amount of yellow.
Roll out a white fondant strip 1" x 3", approximately 2 mm thick.
Flatten and stretch the edge, creating a miniature ruffle with the flat end of a Dresden tool.
Cut ¼” wide ruffle away from the white strip. Using a brush place a small amount of water on the baby's bottom to attach the ruffle at feet level, ensuring that the ruffle tucks under the baby.
Repeat this process layering each raffle slightly higher than the previous one until you reach the curve of the baby’s bottom.
Roller out a thin layer of lime green 50-50, approximately 1 1/2 inches wide by 3 inches long. Ruffle the top and bottom edge. Fold the top edge back approximately a quarter of an inch to form a collar.
Moisten the baby’s back from the neck down to the top of the ruffled panties and underneath the baby.
Attach the baby’s lime green dress and use a dry sponge to mold into the crevices and waistline. Ensure that the dress wraps around and underneath the baby, however, be sure that the baby lies flat on the surface.
Emphasize the waistline and cut a narrow white belt to go around the waist. Make a little blow to sit on the belt.
Use of brown food color pen to color the hair and to detail the eyelashes and eyebrows. Color the lips pink and add some pink color to the cheeks.
Roll out some green paste and cut out a 2” circle. Ruffle the around the edge and gently cup the center.
Lightly moisten the inside of the hat in the cupped section and position on the head. Press the sides down to create a frilly bonnet.
Roll out yellow paste, and to make hatband of flowers using a small half-inch blossom plunger.
Roll out a little piece of lime green paste and cover the feet. Texture by dotting the feet with the end of the Dresden tool so it looks like knitted booties.
Roll out a rectangle of white 50/50 of paste 5" x 4" inches. Use a textured rolling pin to give the blanket a design and then ruffle the edges.
Roll out a thick piece of paste approximately 2" x 1" and half an inch thick. Using the flat end of the Dresden tool ruffle around the edge. Moisten the bottom of the pillow with water and place on top of the blanket. Make a small indentation using a ball tool for the baby’s head.
Moisten underneath the baby and position the sleeping baby on the blanket with her head on the pillow. Give the blanket gentle folds.
Place on a small plaque and attach to the top of the cake.
If this ornamental Isomalt baby is for a baby shower cake, suggest that once the baby is born the ornament is returned so that birth date and time, and the birth weight, with the baby's name can be added to the plaque. This baby ornament can then be placed in a shadow box and hung on the wall as a precious keepsake.